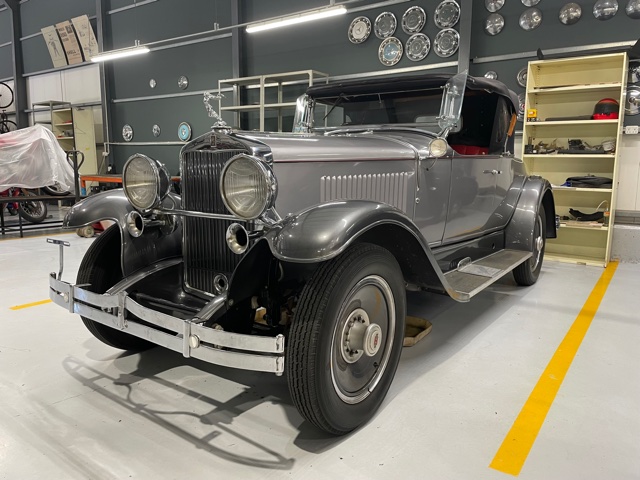
26 Nov Spanner Works: JP du Plessis
A regular feature, outlining the activities of FMM’s workshop personnel who are responsible for repairing, renovating, refurbishing and restoring the museum’s large and varied collection of vehicles. This month, technician JP du Plessis reports on a budget-beating revival of nonagenarian Hupmobile…
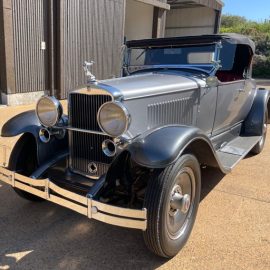
As with many vehicles whose maker closed its doors well before the digital era, ‘Googling’ the Hupmobile Model M Roadster realised very little information specific to this car. However, also typically, it makes one become acquainted with some senior members of society who either have first-hand experience working on these old cars, or have books or documents specific to them. Their assistance becomes invaluable, and so it was with the museum’s Hupmobile…
Having very limited documented history, it was unclear exactly how long it had been since the museum’s Model M Roadster engine last turned over. The car’s coachwork presented well, but the in-line eight-cylinder engine would not turn. This is always a worrying sign, as it almost inevitably means an expensive project is at hand. Nevertheless, the Hupp was taken into the workshop for further investigation, on condition that it could be fixed within a budget – times are hard in this COVID period – and to only replace what was absolutely necessary.
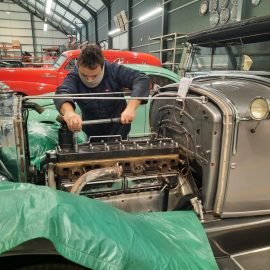
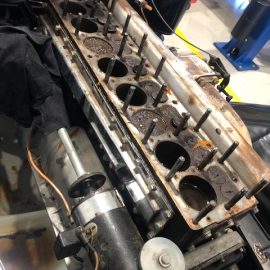
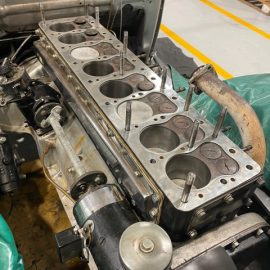
Work started by removing the spark plugs to inspect the compression chambers with the bore scope, but with the engine being a flat-head straight-8, it was difficult to get the camera turned 90˚ one way and again the opposite way. This meant that the cylinder head had to be removed while keeping the engine in the car to disturb it as little as possible.
Fluids were drained and safely disposed of then all equipment attached to the head was taken off, along with anything that might get in the way while removing the head. The head nuts were carefully loosened inversely to the fastening sequence. With help from the rest of the team, the gasket came off with the head as we lifted it off the block, and once on the work bench it could be seen that it had blown through two chambers. But the bigger problem was the engine not turning.
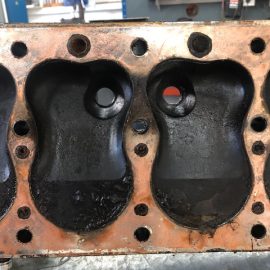
Looking at the block, it was clear that the rings had rusted in the bores, so a patient process of freeing up the pistons commenced. Over a few days, a sequence of penetrating oil, fresh vinegar and electrolysis was applied to the bores. While the rings were soaking up the various forms of releasing agents, attention turned to the auxiliary equipment including the water pump, hoses, carburettor and Autovac fuel pump. Each of these was given a proper scrub and the more delicate parts placed in the ultrasonic bath to ensure as much of the loose dirt as possible was removed. Michael repainted each item that required it.
Eventually, the rings were freed from the bore and the engine could be turned to loosen the connecting rods and pistons. But with the engine in the car and the crank remaining in the block, this was not easy. The big ends were too large to slide through the bore, and the wrist pins had to be removed to separate the pistons from the con-rods so that the pistons could be removed from the top, while the rods came out the bottom past the crank. Donnie helped me with this task and while removing the items, the con-rods and pistons were marked in sequence of removal. However, I noticed that the original punched markings were out of order on the con-rods and caps. In the past, someone had replaced the bearings and possibly mismatched these caps. More on that later…
Curator Wayne assisted in finding the correct size bearings and piston rings through an old contact, and he arranged for a new head gasket to be made up in the Windy City. I cleaned the engine block and honed the bores to get rid of the ridges caused by the rusty rings. After that, my attention turned to the Stromberg UU-2 Twin carburettor, which was in very poor shape. After cleaning it in the ultrasonic bath, it was evident that a few cracks had already been repaired with an epoxy of sorts. The threads where the needle valves and metering jets screwed in were badly damaged, and the casting was porous throughout. So, Wayne suggested using a spare carburettor we had from a 1925 Chevrolet 4-cylinder, which would at least allow the Hupp to run while searching for a suitable replacement for the original. With the Chev carb being a single-barrel, to match this carb to the intake manifold I had to fabricate a two-into-one manifold and make up the accelerator and choke linkages.
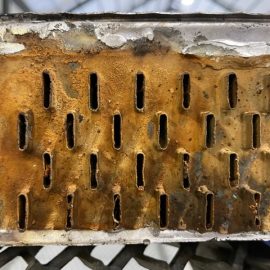
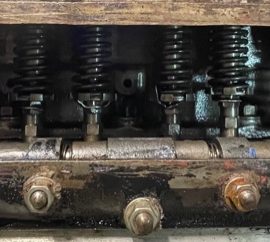
I then refurbished the water pump, while Michael helped with some tinning on the old radiator after unblocking a few cores, and also tinned the fuel tank. The Autovac was assessed and Donnie and I managed to get the internals to work as they should. Next, various other gaskets were traced out and punched from Velomoid. Although the valves moved freely after getting the engine to turn, they looked rough and had rust at the seats. The valve assemblies were removed and each valve then polished on the bench, lapped into the seats then reinstalled and adjusted according to settings obtained from a gentleman in the antique furniture business, who happens to own a similar Hupmobile.
When the piston rings and bearings arrived, engine reassembly took place and I made a basic jig to fit in my Dremel for filing the rings. Donnie assisted in getting the pistons and con-rods together from above and below the block and back onto the crankshaft. However, by piston number five, the engine would not turn freely any more. Worry set in, but then I remembered noting the rod end caps being mismatched when we removed them. I initially thought that maybe they had been re-engineered at some stage, but when I swopped the end caps to the original markings, the engine turned freely as expected. Great relief!
With the pistons in and the rod bolts torqued, it was time to fit the cylinder head back onto a freshly made head gasket, sprayed with some copper gasket sealer. The 27(!) head nuts were then fastened and torqued to spec in sequence. After refitting all the auxiliary engine equipment, cabling and hoses, oils and coolant were filled. A manual pressure gauge was installed in the oil gallery to check for oil pressure while turning the engine over without spark. Once that was established, the car was started and after a few details on the fuel system were fixed, FMM’s 1929 Hupmobile Model M Roadster was moving under its own power again.